

 [2]
[2] [3]
[3] [4]
[4] [5]
[5]
 140716
What a great way to make pom poms. I always have problems making tiny ones.. Thank you for the great directions.
You ladies are so talented. I have learned a lot from this web site!!!!
Kathy
VA
 6193
6193thanks Sue, what a fabulous way of doing this, I will have to show my Grand daughters as they are on 2 weeks school holidays now...
 25546
25546Clever idea ,sure beats cutting out cardboard circles & you always know where to find a fork.
 25212
25212I used those sticky circles for repairing holes in your files.
I put two together to make one side, twice. Then used a tapestry needle to pull the embroidery floss through the hole. Made a very nice pompon and very tiny. Will have to remember to try out the forks method for small wool pompons.
(And yes my spelling is correct - checked the old pattern books)
I would never have thought to make one so very teeny tiny as to use the hole reinforcement stickers but if understanding you correctly you are taking two and overlapping them so between the two holes you have just the distance from the hole to the outside edge but doubled layered just between the two holes. Do you also use the reinforcement stickers on the back side to cover the adhesive? Going to need to try this out just because they are so very tiny.
 85867
85867Thank you
 by anitapatch
25 Feb 2015
by anitapatch
25 Feb 2015
I could see those pompoms as a windowdecoration put on a fishline as I did with the hearts
 113325
 30988
30988Thank you so very much for the great photos and all the instructions.
 88650
88650thanks for the new to me tutorial, I see cleverness runs in the family. Thank you both
Nice to see this reminder....this was one of the first things that my Mom taught me to make almost 60 years ago...great to see it come back to the forefront...
 6831
6831the answer to finger free knots is, when u bring the two end together just twist them around the oppisite thread a couple of times. then pull up tight and then tie your knot, no spipping, just a nice tight knot and all your fingers. hope that helps/
 173580
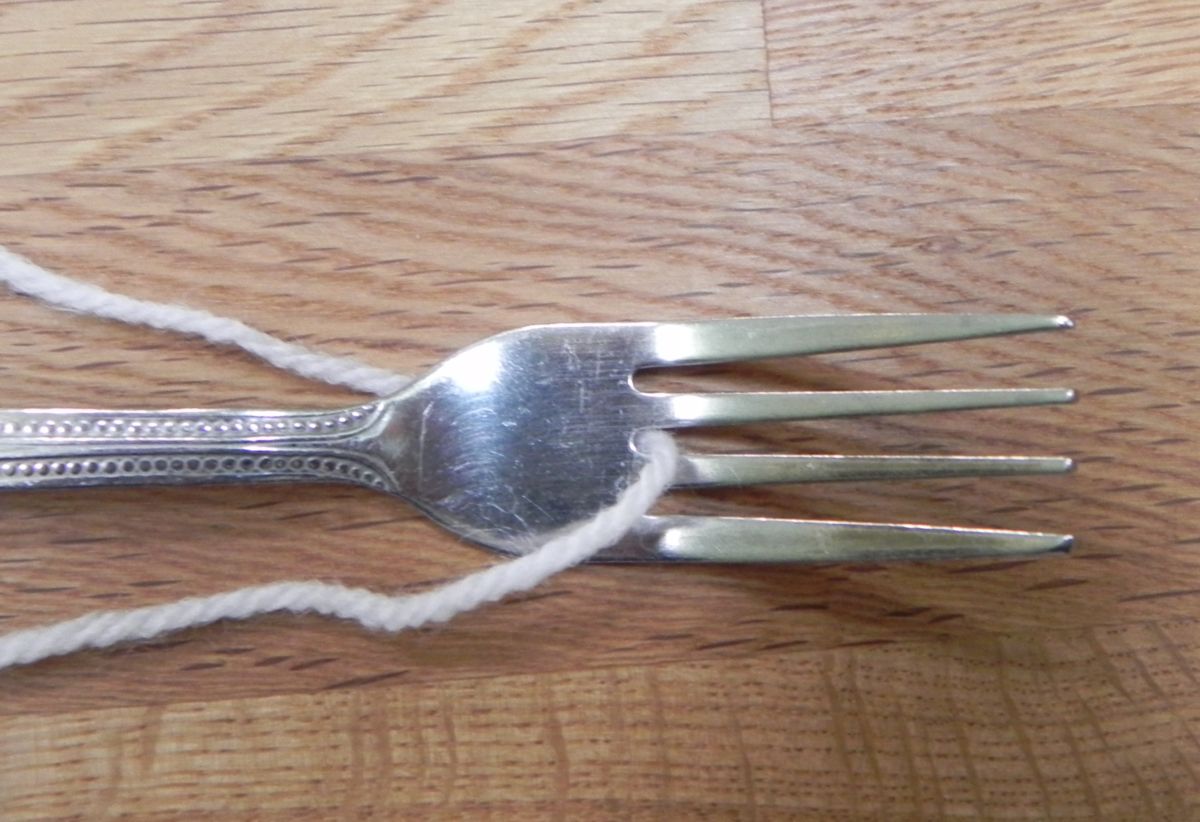
Great tip! I had always used just a piece of cardboard to wrap yarn around to make pompoms... this is perfect for the tiny ones. Thanks Sue.
And... love the idea to use this method to make those tiny bows too (Thanks mops!)
 253107
 51302
51302 158553
 168905
Great way to do it and nice to remind everyone. I learned making them around two circles of cardboard with a hole in the middle. But prefer the fork-method, especially for kids. It's fast and foolproof.
A fork is ideal to make tiny bows as well.
 by spendlove
22 Feb 2015
by spendlove
22 Feb 2015
I've done bows with a fork, but I've always used a ruler for pompoms (similar method to this, but they come out bigger because you only get one lot of loops to trim.) I could never get on with the cardboard circles!
 145196