
318555✽
Hi Cuties! Any of you ever used the Circular sewing attachment for your machine? I saw one for the Ellisimo and was thinking about getting it...but, not sure how much I would really use it...it's made for sewing decorative stitches in perfect concetric circles...so...anyone got any yeas or neys? Thanks Cuties!
Comments (12)

20661✽
If you tape a thumb tack down on the bed of your machine and help the fabric along while stitching you won't have to buy the additional foot. Really works. Hugs Karen
2 comments
Wow...thanks for the tip! I think I'll give it a try...the circular attachment is about $70! My dealer sent it home with me to try...I think I'll do a "test" both ways! I'll post a note when I compare the two...with the attachment and with the thumbtack...Thanks again!
...thats with the thumbtack!

11220✽
by
bonnetgirl
14 Jun 2012
+6✽
Let's see .... I purchased my circle attachment approximately 17 to 20 years ago for my Janome...How many times did I use it? 1 time. I always lay a plate down and draw the circle and stitch away on the inside of the line....You can use the edge of your foot along the line to make it perfect. Hope this helps you.
Hugs Joann
Hugs Joann
1 comment
Thanks for the info...also a good tip...got lots of plates in lots of sizes!
7314✽
bought one for the brother 4000 never used it,did see some very nice projects made with it,

2079✽
I have one for my Bernina and so far I have used it a few times. I think it would be good to use to make coasters, either with interfacing between fabric layers and zigzag around the outside or with a decorative stitch on felt with a design in the middle.
Maureen
Maureen

96286✽
by
dailylaundry
14 Jun 2012
+2✽
Let us know your experiment with the thumbtack! I have considered buy one also - but, not sure if it is worth the cost!! Hugs, Laura*
1931✽
I learned the thumbtack method also! That was years ago of course. You measure from the needle, half of the diameter (for example 3.5" for a 7" circle) and tape the thumbtack down. Place the center of the fabric on the thumbtack. Place a small piece of cork or eraser on the tack point to keep from scratching yourself. Sew your circle; the feed dogs will turn the circle automatically. I sewed 4 designs inside the 7" circle and then cut it into quarters and sewed it on the corners of a quilt block with a 5th embroidery design. Have fun!
2 comments

I also use the thumb tack (old metal flat head type) taped to bed of machine. Box of tacks way cheaper than attachment.
S
S
This is how I do it too. I move the thumb tack along a ruler. The feeddogs do all the work and the thumbtack keeps it centered. Hugs, Susan

122864✽
Do you mean the one at the link I added below?
I bought one of these a couple of years ago and still haven't used it. Pauline (Nonna57) tried hers but said she couldn't get it to work properly. Might have helped if she read the instructions first. LO
I bought one of these a couple of years ago and still haven't used it. Pauline (Nonna57) tried hers but said she couldn't get it to work properly. Might have helped if she read the instructions first. LO
1 links:
[1]
http://www.shoppersrule.com/pc/fsf/sewmall36/index.html
www.shoppersrule.com

25510✽
Why spend the big bucks? I use a thumbtack and get the same results. Hugs, Susan
318555✽
by
dragonflyer
14 Jun 2012
+4✽
Okay, so here are the results...Thumbtack wins! Tried the circular attachment...worked well, not surprised, but it's $70. Thumbtack worked just as well..but, I did not tape it to the bed of the machine. Took a strip of Invisi-Grip cut about3" wide and 10" long..drew a black line down length of center, measured 1/4" and marked vertical line at each 1/4", put tack point at intersection of first line..lined up the long horizontal line with the needle to keep circles straight..pressed down the Invisi-Grip on the machine table (thumbtack on bottom with point up!), placed center of fabric over tip of tack, pressed down...sewed my design..
4 comments
Then, took off fabric, moved thumbtack to another line marker with tack through intersection cross lines...chose another pattern, placed fabric back down using same hole in fabric as first circle...sewed and presto, another perfect circle. Really easy to move the Invisi-Grip, holds tight, and keep straight using the long center line I drew on the Invisi-Grip and needle position. Hope this makes sense!
Okay, I am a little dense - can you take a couple of pictures of it? I don't quite understand what you did to attach it. Thanks and Hugs, Laura*
line up straight with the long line in the middle of the Invisi-Grip placed horizintally from the needle on the bed of the machine..Hope this makes sense...must keep fabric flat as the feed dogs move it around. Looked just as good as the one with the $70 Circular Attachment!
Don't know how to load a picture...but the invisi-grip is a clear plastic and it's like the old colorforms...stick all by itself, lifts up and sticks...mostly used for backs of rulers to keep them from slipping on fabric when cutting.

7199✽
I too used the thumb tack method but found the stitches don't join nicley at the end. I recently got the Brother circular attachment at half price and it does come with 2 decorative sewing feet, and the stitches join better, BUT - the thumb tack is almost as good and free. Lyn. xx
2 comments
Good that you got half price...already have the feet..if you sew one repeat of pattern as test, measure, divide pattern length by circumference of circle..gives you number of repeats of pattern so you can adjust pattern size to fit.
of course. I didn't think of that. Thanks. xx

52686✽
by
shirley124
14 Jun 2012
+1✽
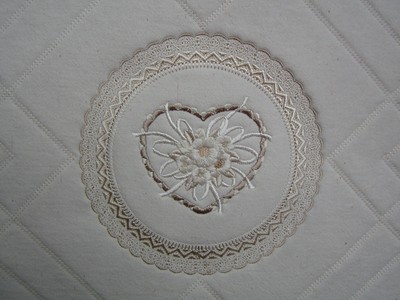
I used mine a lot when I first got it. Did some lovely circular edges on blocks for a quilt with flowers in the middle. Still have not finished the quilt thought. It is one of my UFO"s Shirley
52686✽
by
shirley124
15 Jun 2012
+2✽
Here is a close-up of one of the squares I did using the circular foot. Shirley
1 comment
Wow...beautuful! Thanks for sharing....gives a new meaning to circular sewing!